Quick Start Guide
We’ll explain a simple example to help you understand what Kapow! can do and why it is so awesome :-).
Scenario
In this example we’ll consider that our scenario is a corporate network like this:
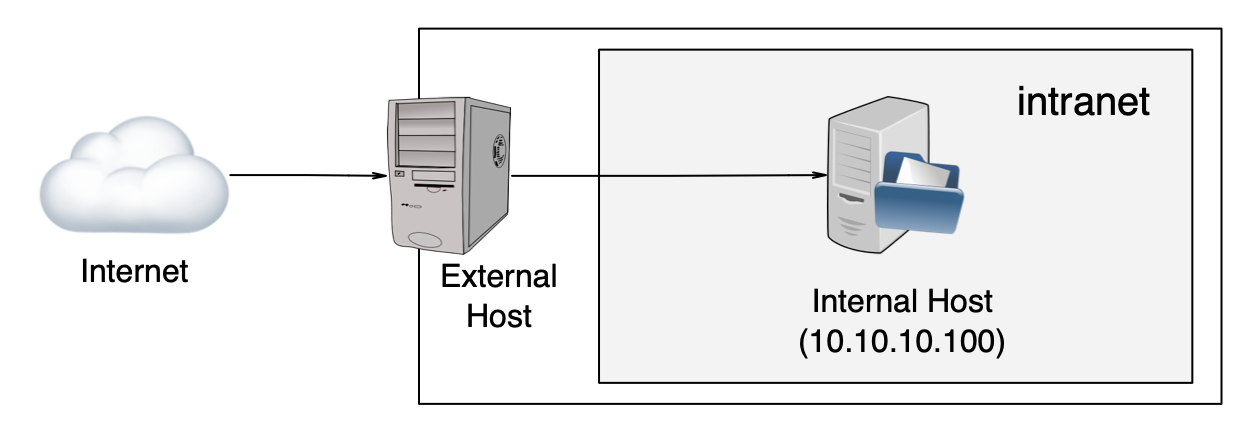
Our organization has an external host that acts as a bridge between our intranet an the public Internet.
Goal
Our team must be able to check if the Internal Host is alive on an ongoing basis.
Limitations and Constraints
- We don’t want to grant access to the External Host to anybody.
- We don’t want to manage VPNs or any similar solutions to access Internal Host from the Internet.
- We want to limit the actions that a user can perform in our intranet while it is checking if Internal Host is alive.
- We want to use the most standard mechanism. Easy to use and automate.
- We don’t have a budget to invest in a custom solution.
The Desired Solution
After analyzing the problem and with our goal in mind, we conclude that it is enough to use a simple ping to Internal Host.
So, the next step is to analyze how to perform the ping.
Accessing via SSH to External Host
If we choose this option, then, for every person that needs to check the status
of Internal Host we need to create a user in the External Host and
grant them ssh access.
Verdict
This is not a good idea, because:
- We’d need to manage users (violates a constraint).
- We’d need to grant users access to a host (violates a constraint).
- We would not be able to control what options the user could provide to ping (violates a constraint).
Develop and Deploy a Custom Solution
OK, this approach could be the best choice for our organization, but:
- We’d need to start a new project, develop, test, manage and maintain it.
- We’d need to wait for for the development to be production ready.
- We’d need a budget. Even if we have developers in our organization, their time it’s not free.
Verdict
This is not a good idea, because:
- We’d need to spend money (violates a constraint).
- We’d need to spend time (and time is money, see reason #1).
Using Kapow! (spoiler: it’s the winner!)
OK, let’s analyze Kapow! and check if it is compatible with our constraints:
- Kapow! is Open Source, so it’s also free as in beer.
- By using Kapow! we don’t need to code our own solution, so we don’t have to waste time.
- By using Kapow! we can run any command in the External Host, limiting the command parameters, so it’s safe.
- By using Kapow! we can launch any system command as an
HTTP APIeasily, so we don’t need to grant login access to External Host to anybody.
Verdict
Kapow! is the best choice, because it satisfies all of our requirements.
Using Kapow!
In order to get our example scenario working we need to follow the steps below.
Install Kapow!
Follow the installation instructions.
Write an Init Program ping-route
Kapow! uses init programs/scripts where the endpoints you want to expose are defined.
For each endpoint, you can decide which commands get executed.
For our example we need a file like this:
$ chmod +x ping-route
$ cat ping-route
#!/usr/bin/env sh
kapow route add /ping -c 'ping -c 1 10.10.10.100 | kapow set /response/body'
Let’s dissect this beast piece by piece:
#!/usr/bin/env sh- shebang line so that the kernel knows which interpreter to usekapow route add /ping- adds a newHTTP APIendpoint at/pingpath in the Kapow! server. You have to use theGETmethod to invoke the endpoint.-c- after this parameter, we write the system command that Kapow! will run each time the endpoint is invoked.ping -c 1 10.10.10.100- sends oneICMP ping packetto the Internal Host.| kapow set /response/body- writes the output of ping to the body of the response, so you can see it.
Launch the Service
At this point, we only need to launch kapow with our
ping-route:
$ kapow server ping-route
Kapow! can expose the user interface through HTTPS, to do this provide the corresponding key and certificates chain paths at startup:
$ kapow server --keyfile path/to/keyfile --certfile path/to/certfile ping-route
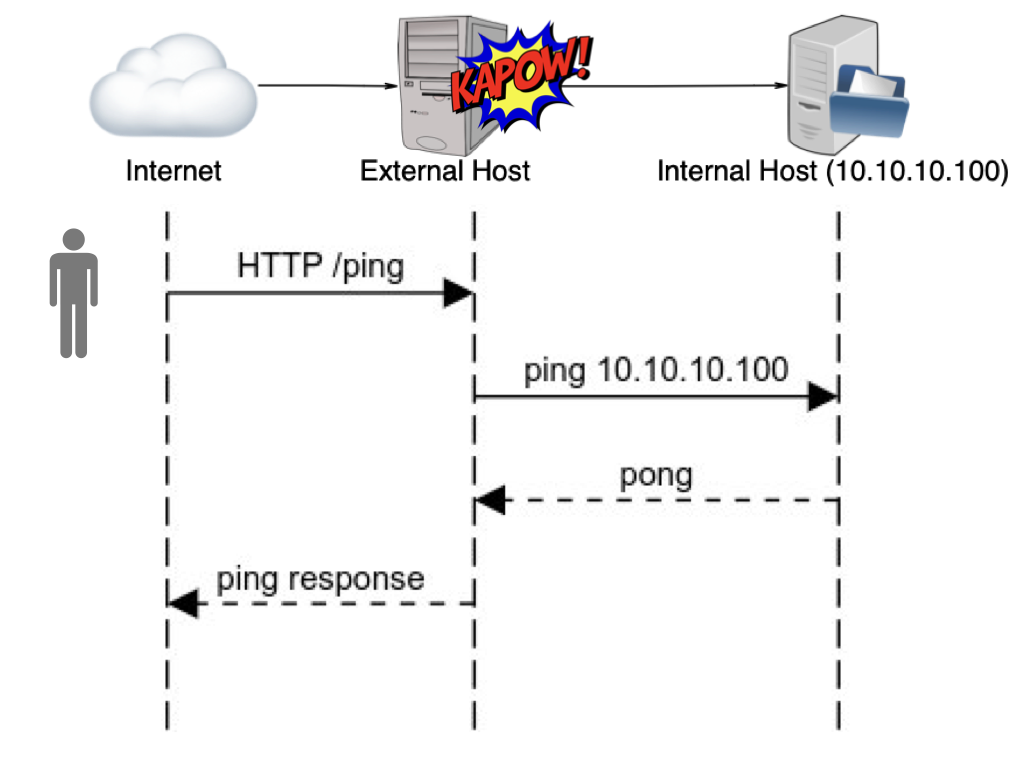
Consume the Service
Now we can call our newly created endpoint by using our favorite HTTP client.
In this example we’re using curl:
$ curl http://external.host/ping
PING 10.10.100 (10.10.100): 56 data bytes
64 bytes from 10.10.100: icmp_seq=0 ttl=55 time=1.425 ms
et voilà !, if you’re using HTTPS don’t forget to provide the CA certificate if needed:
$ curl --cacert path/to/CAfile https://external.host/ping
PING 10.10.100 (10.10.100): 56 data bytes
64 bytes from 10.10.100: icmp_seq=0 ttl=55 time=1.425 ms
Under the Hood
To understand what’s happening under the hood with Kapow! let’s see the following diagram:
As you can see, Kapow! provides the necessary mojo to turn a system
command into an HTTP API.